


Ever wonder how to check if your car battery is still good? Knowing how to properly test your battery can save you from unexpected breakdowns and costly replacements.
By following the right steps, you can accurately assess its health and decide whether it needs replacing.
Keep reading to learn the simple process that will give you peace of mind about your battery’s condition.
Identify Your Battery Type, CCA, and Test Standard First
Before testing a battery, you need to identify its chemistry—flooded lead-acid, AGM (flat or spiral wound), EFB, gel, or lithium—and set your tester to match that specific type. This step is essential because selecting the wrong chemistry causes inaccurate results. Different internal profiles are used by the tester for each battery type and physical design, affecting the test outcome.
Check the battery label for clues; it usually states the chemistry or intended application. Additionally, locate the cold cranking rating (CCA) and the standard used (such as SAE, EN, DIN, IEC, or JIS). Enter the CCA exactly as printed and select the matching standard from the tester’s menu. Be precise—these numbers vary between standards for the same battery. For a reliable reading, ensure the tester you use comes from top battery picks with terminals that combine quality, performance, and value. Correct setup ensures you get reliable readings of the battery’s health and starting power.

[Car Battery Tester] You can easily test and inspect your 12V lead-acid battery with this TOPDON car battery tester. The SOH (State of Health), SOC (State of Charge), Voltage, Current, Rating, and numerous other understandable analytical data are provided by this battery tester. It is compatible with 100-2000CCA regular flooded, AGM flat plate/spiral, EFB, and GEL for their optimum performance.
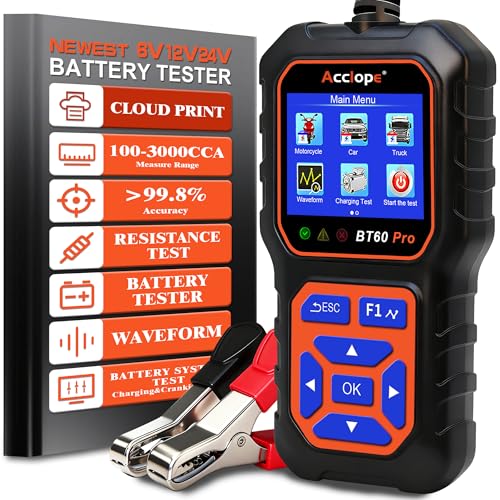
Wide Battery Compatibility: The ACCLOPE BT60 PRO supports 6V, 12V, and 24V batteries, including lead-acid, AGM, GEL, EFB, and lithium batteries. LiFePO4 support is limited to voltage/health checks and does not guarantee precise CCA(100-3000) measurement. The device is not compatible with 48V systems. Battery Tester Only - NOT OBD2 / NOT a Code Reader (Does NOT read/clear DTC). This versatile car battery tester provides reliable diagnostics for professionals and DIY users, making it an essential tool for diverse battery testing needs

✅【Car Battery Tester】 BR502 can test all 6V/12V/24V 100-2000CCA batteries including regular flooded, AGM flat plate, AGM spiral, or gel batteries, compatible with cars, SUVs, Pickups, Boats, Motorcycles and etc. Provide overall analysis of batteries’ health and help you know its status in advance before it dies.
Connect Your Battery Tester Safely to the Terminals
Always switch off your battery tester before making any connections to prevent arcing at the terminals. Start by inspecting the clamps: check that leads are undamaged and insulation is intact to ensure safe and reliable testing. Next, clean the battery posts using a wire brush or cloth to remove corrosion or grease, which can interfere with good contact. For a home-made battery strap, you must ensure the insulation is intact to avoid dangerous shorts during assembly. To prevent damaging the cable coating, use a gentle pulling motion when feeding the wire through tight spaces.
Attach the red clamp to the positive (+) terminal and then connect the black clamp to the negative (–) terminal. Confirm the correct polarity by verifying the markings—look for a plus (+) or POS label. For a secure connection, gently rock each clamp to ensure it makes firm contact; loose clamps can cause inaccurate readings. Keep the two clamps apart to avoid accidental contact and do not reverse the order of connection, as this can cause a short circuit. Always hold the insulated sections of the cables, keep your hands dry, and position the tester to avoid strain on the cables. Only after completing these steps is your tester ready to provide valid measurements. A reliable solar panel system often uses MC4 connectors for secure and weatherproof electrical connections.
Set Your Battery Tester’s Type, CCA, and Standard
To ensure accurate battery testing, you must set your tester’s chemistry, CCA, and standard to match the battery’s specifications precisely. First, select the correct chemistry type—flooded, AGM flat plate, spiral AGM, gel, or EFB—based on what’s printed on the battery label. Using the wrong chemistry setting can lead to incorrect health assessment results. Next, input the exact Cold Cranking Amps (CCA) rating from the label; most testers accommodate 100 to 2000 CCA, but verify your device’s range to be certain. Entering the correct CCA ensures the reading reflects the battery’s true capacity. Finally, choose the appropriate standard—such as CCA, SAE, DIN, IEC, or EN—that matches the printed specifications. Don’t estimate these values based on battery size or vehicle type; always use the precise figures from the label. Confirm that your tester supports all three settings—chemistry, CCA, and standard—before testing, as mismatched settings can produce misleading results. For safely handling electrical components, always disconnect the main power to prevent shock. A battery maintainer is a separate device that provides a low, steady charge to keep a battery topped off without overcharging, ideal for long-term storage. For shrink wrapping terminals, a precision heat gun ensures an even seal without damaging the battery casing.

HIGH COMPATIBILITY: It is not only suitable for AA, AAA, C, CR123A, D, 9V, N, CR2, CRV3, 2CR5, CR-P2 cylindrical battery testing, but also good for checking a wide variety of button cell batteries

Catch Battery Problems Early: Featured in two videos by Project Farm, a popular YouTube channel with millions of subscribers, the ANCEL BA101 helps you quickly spot battery issues before they leave you stranded. It provides easy-to-understand readings for State of Health (SOH), State of Charge (SOC), voltage, current, CCA, plus cranking and charging system tests, so you can better understand your battery and help avoid unexpected breakdowns

MULTI PURPOSE USE- can be used to test different type of household batteries like AA, AAA, C, D, 1.5V,9V and 1.5V button type
Run the Battery Tester Test and Decode the Results
When you run the Battery Tester Test and decode the results, focus on the voltage behavior during the test. A healthy 12V battery usually stays above 9.6V under load. If the voltage drops sharply below that point, it often indicates a failed battery or a bad cell. Start by checking the open-circuit voltage before testing: above 12.4V suggests a well-charged and healthy battery, while below 12.0V points to discharge or damage. Unlike a multimeter, a dedicated battery tester provides a load-based analysis that measures internal resistance and CCA performance directly. Just as you would locate your apartment’s breaker box before handling electrical circuits, you should find the battery in a safe, accessible spot before testing.
Be aware of common testing mistakes, such as overlooking low state of charge, which can skew results. When interpreting the test, compare the measured Cold Cranking Amps (CCA) to the battery’s rating—aim for at least 70 to 80 percent of the rated CCA to consider the battery strong. The tester’s verdict provides quick guidance: “Good” means the battery is healthy; “Good – Recharge” indicates it needs charging; “Bad” signals it should be replaced. If the battery remains weak even after recharging, that confirms it has failed. Watch for signs like high internal resistance or a bad-cell flag, both of which support the need for replacement. A grounding wire’s a clean, reliable result relies on the same precision used in the tester’s clean connections and step order.

【Reliable Automotive Car Battery Tester】 KW208 is the most cost-effective battery load tester compared to other brands, it has all the functions you need and the lowest cost that you can afford. KW208 can test all 12V batteries(100-2000CCA) including regular flooded, AGM flat plate, AGM spiral or gel batteries. Provide overall analysis of batteries’ condition and help you know their status in advance before it dies. KW208 battery analyzer supports cranking and charging system tests also alternator and starter test. Conveniently store this car battery tester for batteries in your glove box or garage, ready for use whenever needed.

🔋High Value Battery Tester: BM200 is your go-to solution for 12V lead-acid and lithium battery. Equipped with advanced features like voltage & cranking & charging system test, abnormal alarm and real-time trip records.This battery monitor ensures your car battery is always in optimal condition. Whether it's for your car, motorcycle, truck, RV or boat, this 12V battery tester has got you covered. Get it, and forget winter breakdown worries.

【Reliable Car Battery Tester】: The alternator tester can accurately determine whether the car battery needs to be replaced or if there is a power outage, and at the same time evaluate the output status of the alternator, clearly presents real-time voltage data, battery health and charging status. It can effectively prevent the battery from being damaged due to overcharging or undercharging, and extend the battery's service life.
Disconnect the Battery Tester and Log Your Results
Once you disconnect the battery tester, begin immediate data recording. Log the battery ID, test date, and the exact displayed result, including voltage, charge level, and any status messages. Specify whether the test was performed inside or outside the vehicle. Note any connection issues such as loose or poor contact, terminal corrosion, or deviations from standard clamp placement. Use a consistent format for your entries to facilitate trend analysis over time. Ensure your logs are stored in a retrievable location, whether digital or physical, to support remote reviews or maintenance decisions later. For reliable results, always verify your readings against top rated battery testers that have proven quality and performance. Understanding these testers can be linked to solar generator principles since both rely on accurate voltage and charge-level measurement. Proper soldering of battery cables can also affect these readings by ensuring clean electrical connections and stable contact.