

Thinking about installing solar panels but unsure where to start? The process isn’t just about snapping panels onto your roof—there are important steps to ensure safety and efficiency.
From checking your roof’s structure to passing inspections, each step is crucial for a smooth installation. Below, you’ll find everything you need to know to get your solar power system up and running properly.
Can Your Roof Handle a Solar Panel Installation?
Start by inspecting your attic for signs of sagging, moisture damage, or rot. These issues can weaken your roof’s structure and compromise its ability to support solar panels. Have a professional engineer assess truss spacing and perform load calculations that account for snow and wind forces relevant to your area. Skipping this step can lead to safety hazards and higher installation costs if your roof isn’t prepared to handle the additional weight. For solar monitoring systems, you may need to run RS485 communication cables from the inverter to a data logger, which requires proper routing and protection against weather. If your home’s breaker box requires an upgrade, breaker box replacement typically takes 4 to 8 hours but can vary based on local code and electrician availability.
Next, evaluate your roof’s material for damage. Different roofing types require specific mounting methods: asphalt shingles, metal, or tile each have unique considerations. Flat roofs often need ballast to secure panels, while tile roofs call for extra care to avoid cracking or damage. Obtain an engineer’s report to ensure your roof can handle the installation safely and effectively. Using inconsistent or incorrect connections may create electrical hazards similar to those seen when mismanaging a battery charger’s clamps on a car battery.
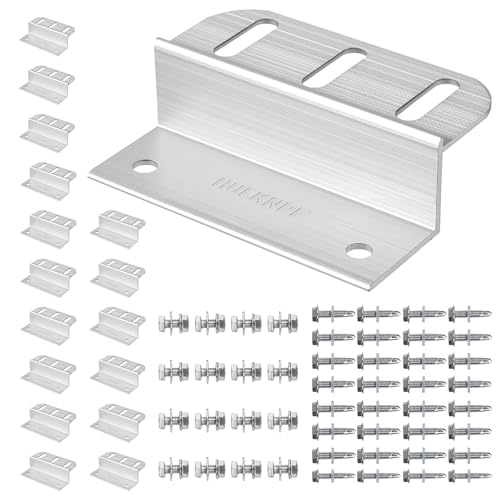
Durable & Wind-Resistant Build: Crafted from corrosion-resistant aluminum alloy, these heavy-duty Z brackets provide long-lasting, stable performance and withstand high winds for outdoor solar installations.

Renogy mounting Z brackets are very easy to use, unique designed, and perfect for irregular surfaces

【SUPERIOR QUALITY】 Anodized Aluminum Z brackets, Stainless Steel Hex Bolts and Screws, service life up to 25 years, perfectly supporting solar panels in off-grid installations.
What Permits Do You Need Before Installing Solar Panels?
You need to submit detailed plan sets that include electrical diagrams and structural details before installing your solar panels. For grid-tied systems, you also must apply for utility interconnection approval. This separate review ensures your inverter specifications and disconnect locations meet utility standards. Your local Authority Having Jurisdiction (AHJ) will conduct an inspection of the work before you are allowed to operate the system. Skipping these permit steps can lead to fines, failed inspections, or unsafe conditions. When disconnecting battery storage during installation or maintenance, always remove the negative cable first to prevent short circuits and sparks. Always check with your specific city or county regulations before starting your installation.
Select Solar Panels and Racking That Fit Your Roof Type
Your roof material dictates the type of mounting hardware you should select for a safe and effective solar panel installation. For asphalt shingle roofs, standard mechanically attached racking systems work well because they can be securely fastened without damaging the shingles. For farms with large metal barns or outbuildings, selecting panels with high efficiency ratings can maximize energy production in limited roof space. Standing seam metal roofs require clamp-based mounts that grip the seams without penetrating the surface, reducing the risk of leaks. Tile roofs need specialized hooks that fit under the tiles to prevent breakage during installation. Flat roofs benefit from ballasted systems that use weight to hold panels in place or tilted systems that facilitate drainage and airflow. When selecting mobile panels for a vehicle, look for monocrystalline solar cells for high efficiency and durability in limited space. A pure sine wave inverter ensures that your solar system delivers clean, stable power compatible with sensitive electronics.
Consider your roof’s pitch, surface fragility, and exposure to wind or snow loads when choosing the hardware. Non-penetrative mounting options are best for standing seam metal and flat roofs to minimize leak points. Always check that your rail spacing and panel size are compatible with roof obstructions such as vents or chimneys. Proper alignment of these elements will help prevent wind uplift issues and maintain the roof’s structural integrity over time.
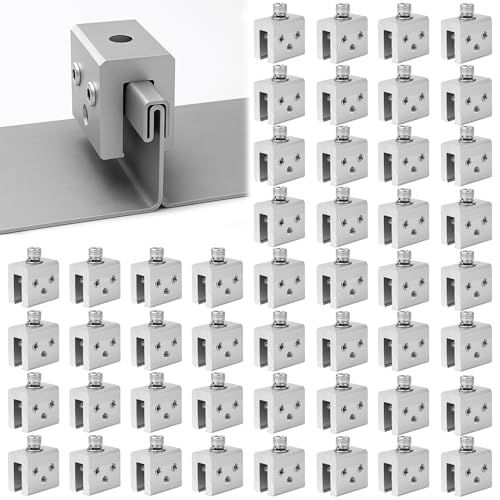
【Non-Penetrating & Weather-Resistant Design】Protect your roof's integrity with our drill-free standing seam clamps. By securing accessories without piercing the metal panels, these clamps help maintain waterproofing and minimize the risk of leaks or rust caused by traditional drilling.

Strong Roof Mounting Support: Designed for secure installation of solar and photovoltaic systems on standing seam or folded sheet metal roofs, offering firm grip to forestall movement under various weather conditions.

【Non-Penetrating & Weather-Resistant Design】Protect your roof's integrity with our drill-free standing seam clamps. By securing accessories without piercing the metal panels, these clamps help maintain waterproofing and minimize the risk of leaks or rust caused by traditional drilling.
How to Prepare Your Roof for a Leak-Free Installation
To prepare your roof for a leak-free solar panel installation, start by assessing its structural integrity. Check the age of your roof—if it’s nearing the end of its lifespan, replacing it beforehand will prevent future issues. Schedule a professional inspection to identify hidden leaks, weak decking, or worn shingles that may not be visible from the ground.
Clean all penetration areas thoroughly by removing debris and loose granules. A clean, dry surface ensures a secure bond for the mounting system and reduces the risk of water infiltration. Repair any cracked shingles, split flashing, or failed boots now to prevent leaks once panels are installed. Applying a high-quality dielectric grease to exposed metal fasteners can further protect against corrosion and moisture intrusion.
Verify the locations of your rafters to ensure that loads transfer into solid framing members. Mark attachment points carefully to avoid valleys, seams, and weak zones that could compromise the roof’s waterproofing. Focus on flashing details: install metal flashing as your primary waterproof barrier, sliding it under the appropriate shingle courses. Use sealant sparingly—only as a secondary barrier on clean, dry surfaces—and maintain compression around fasteners with sealing washers to prevent leaks. Select components that offer consistent performance and value to ensure long-term reliability in your mounting system. Before covering the mounts with panels, inspect every mounting point from the attic for daylight gaps or signs of moisture to confirm a secure, leak-proof base. This process mirrors the function of a battery isolator, which prevents electrical leakage between separate battery banks to ensure system integrity.

This item is Gardner-Gibson 2172 10-Ounce Wet Patch Roof Cement Cartridge

100% waterproof and weatherproof sealant for use on roof shingles, roof tiles, flashing, gutters, skylights, vents and other similar projects is water and rain ready immediately

Seals leaks in all weather
Mount the Racking and Secure Solar Panels Step by Step
Once your roof is prepped and the structural attachments are securely in place, you can proceed with mounting the racking and securing the solar panels step by step. Begin by planning your racking layout to ensure each row provides a continuous, level surface. Focus on aligning the rails parallel to each other, with spacing that matches your module dimensions to maintain proper spacing between panels.
Join racking sections using splice hardware, leaving the specified expansion gaps to allow for thermal movement. Attach the rails to the roof anchors by tightening each connection to the required torque, typically specified by the manufacturer. Before placing any modules, verify that the rails are level and straight to ensure proper panel alignment.
Position the first module squarely on the rails with appropriate end clearance. Secure it with end clamps, making sure the module frame sits flush against the clamps. Although not yet connected to wiring, ensure your panels feature MC4 connectors to simplify future electrical connections. Then connect adjacent panels using mid clamps, selecting the clamp type that matches your frame thickness. Be sure to tighten all fasteners evenly to the recommended torque, usually between 12 and 20 N·m, to prevent deforming the panel frames. Proper installation of racking components is similar to choosing a panel cover for your breaker box, as both require matching specific hardware to your system’s dimensions and manufacturer specifications. For reliable long-term operation, ensure your battery charge controller is compatible with a smart 6 volt charger to maintain ideal charging profiles.
Inspect each row for straightness and confirm that all clamps are fully installed. Properly mounted panels should sit securely and level, providing a stable foundation for the rest of your solar system.

Product Includes: a kit containing 8 L-Foot mounts with flashing, complete with bolts and hardware, specifically designed for asphalt shingle and composite tile roofs, compatible with most common photovoltaic rails, meeting the installation needs of residential solar modules

[Roof Solar Mounting Brackets] Suitable for metal roof, shingle roof. 10 set of solar mounting brackets can hold up to 4 solar panels.Instead of the very short 4” mini rails, we offer 10x 6” rails, which are 50% longer and more flexible. -- Please notice that this solar panel mounting brackets is compatible to solar panel thickness: 1.37-1.4 inches.

-DIY SOLAR INSTALLATION : Quick and straightforward.Featuring height-adjustable design, it securely fits all standard framed PV panels from 30mm to 35mm thick.Ideal for building off-grid power solutions, it's perfect for cabins, RVs, boats, and homes, and is specifically designed for side-by-side installation of 2 solar panels.
Wire Your Solar Panels: Run DC Cables and Connect Strings
To wire your solar panels, run DC cables and connect the strings properly. Start by selecting the right cable size: for short residential runs, use 4 mm² to 6 mm² conductors; for longer distances, opt for 10 mm² or larger. Calculate voltage drop to stay below 2% over the run length, and size conductors at 125% of the module short-circuit current to ensure safety and efficiency. Ensuring proper connections also helps revive dead batteries when using a compatible charger downstream. A 400-watt power inverter can power small devices such as LED lights and a laptop but not high-draw appliances.
Build your strings carefully, making sure they stay within the inverter’s voltage limits, especially considering increased Voc in cold weather. Keep the wiring polarity consistent—verify + to + and – to – at each connection to prevent damage. When assembling MC4 connectors, strip 6–7 mm of insulation, crimp the pins securely, and seat them until locked, then tug lightly to confirm a firm connection.
Route the DC cables along the shortest, most protected path, avoiding areas where abrasion or UV exposure could cause damage. Keep parallel runs neat and clearly labeled for easy identification. Before switching the system on, double-check the polarity across the entire string to ensure all connections are correct and secure. For downstream battery storage, always use a charger that matches safe voltage limits to prevent overheating and damage.

Quick Parallel 2 Solar Panels: BougeRV 1 to 2 Y branch cable can parallel 2 solar panels. The kit includes 1 male to 2 female (M/FF) and 1 female to 2 male (F/MM) solar connectors

Package Included: 6 pairs solar panel connectors Male and Female + 6 pairs solar connector pins (male and female) + 1 pair of spanners
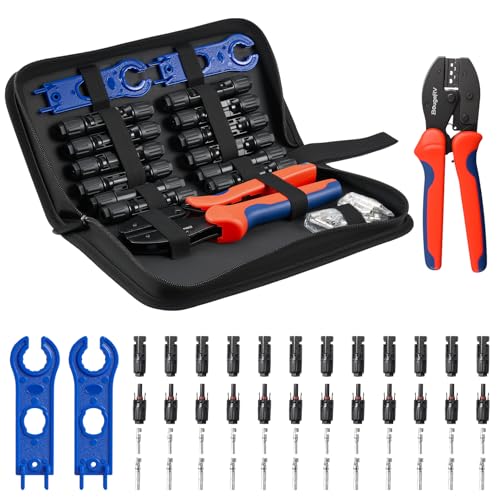
Complete Tool Kit: This complete BougeRV solar crimping tool kit includes a wire crimper, 2 spanners, a convenient carrying case and 12 pairs of standard pv connectors. Great for beginners and experienced installers
Connect the Inverter and Ground Everything Safely
Because the inverter contains high-voltage capacitors that can hold a lethal charge, you must shut it down completely before doing any grounding work. Switch off the AC mains supply first, then disconnect the DC connection plug. Wait at least one minute for the stored energy to discharge before touching any grounding hardware. Use lockout/tagout procedures to confirm the equipment is de-energized. For persistent fault conditions such as shutdown errors, performing a SolarEdge inverter reset can help clear minor internal logic glitches without replacing the unit.
For proper inverter grounding, connect the chassis directly to the equipment grounding conductor using the designated grounding terminal. Do not improvise—use the specified lug and tighten all grounding hardware to the manufacturer’s recommended torque, such as 6.2 Newton meters. Each inverter’s grounding conductor should run individually to the main grounding busbar; avoid connecting multiple inverters in series. Remember that only one neutral-ground bond is permitted in the entire system to prevent multiple current paths. If your battery bank uses AGM batteries, they require a different charging profile than standard flooded types. A solar charge controller helps prevent overcharging by regulating the voltage and current from the panels to the battery, acting as a critical safeguard for system longevity.
Ensure all metal-to-metal contact is clean and free of any oxide layers to guarantee good conductivity. Use corrosion-resistant connectors to prevent future corrosion issues. Finally, drive the grounding electrode vertically into moist soil to achieve the best electrical conductivity. Keep all DC lines separate from the grounding path to prevent electrical interference.
Test Your System Voltage Before Flipping the Switch On
Before flipping the switch on, you must verify your system voltage. Set your digital multimeter to DC voltage and select a range above your expected open-circuit voltage (Voc). Measure each solar string’s voltage at the combiner box or inverter wiring compartment, making sure to record polarity to identify any reversed conductors. Compare your readings to the expected values adjusted for temperature; a variance within plus or minus 5 percent is acceptable. Significant discrepancies can indicate string mismatch, shading, or wiring issues that need correction. If batteries are present, ensure they are isolated and wired correctly before testing. Any voltage reading exceeding your equipment’s input rating requires immediate attention. Also, check continuity and insulation resistance, aiming for at least 1 megaohm per kilovolt on DC cabling. Correct all faults before energizing the system. For a reliable connection, ensure each MC4 connector crimp is inspected for proper tool markings and pull strength to prevent arcing or voltage drop.
Pass Final Inspection and Get Utility Permission to Operate
After your system passes the AHJ inspection, you cannot power it on until you receive Permission to Operate (PTO) from your utility. The inspection verifies that your system’s panel placement, electrical connections, labeling, and rapid shutdown meet code requirements. If everything complies, the inspector will stamp your permit.
Next, you must submit this signed inspection approval to your utility. Obtaining utility approval is a essential, separate step. The utility reviews that your system aligns with the interconnection agreement and might need to execute a meter swap. Powering on your system before receiving written PTO is prohibited, as it violates safety protocols and your agreement. Only after the utility grants PTO can you safely turn on your system and legally export power to the grid.
Prevent These 3 Common Solar Installation Mistakes
Before mounting your solar panels, three critical mistakes can impact your system’s performance and safety, so it’s essential to get these right. First, properly size your system based on a 12-month utility bill rather than estimate. An oversized array reduces your return on investment, while an undersized one makes you dependent on the grid. For optimal energy production, orient your panels south at your local latitude. Mechanical sun tracking systems are unnecessary; a fixed, correctly angled mount offers reliable performance and costs less.
Second, thoroughly assess your roof’s condition and structural integrity before installation. Leaks caused by improper flashing can lead to costly repairs down the line. Confirm that your roof can handle the system’s weight and ensure there’s easy access for cleaning panels and performing future maintenance or repairs.
Finally, take care with electrical wiring. Incorrect wiring, like reversing a string or using loose MC4 connectors, can diminish system output or even cause fires. Always crimp connections tightly, label your wires clearly, and ground everything according to electrical codes. Avoiding these three mistakes ensures your solar setup remains safe, efficient, and financially worthwhile.