

Ever wonder how to make secure electrical connections with a crimping tool? Getting a reliable crimp is key to safety and durability in wiring projects, whether you’re fixing a car, installing a device, or working on home wiring.
By the end of this guide, you’ll know how to choose the right crimper, prepare your wire, and ensure your connections last.
Let’s walk through the steps to help you get professional results, even as a beginner.
What You Need Before Crimping
Before you start crimping, the circuit must be powered down and confirmed dead. Use a tester to verify this, as skipping this step risk electric shock or damage. Wear safety glasses and gloves to protect yourself from sparks or sharp wire ends. Gather your tools: a crimping tool designed to match the wire gauge, wire strippers, cutters, and a multimeter for testing. Always perform a test crimp on scrap wire first to ensure your tools work correctly and the settings are appropriate. For reliable connections, refer to reviews of top battery picks with terminals to select connectors that match high quality and performance standards.
Prepare the wire by confirming its gauge using the wire gauge markings or a multimeter. Cut the wire to the needed length and strip only the barrel length—typically about 1/4 inch or 6 mm—so the metal is exposed for a proper crimp. Avoid nicking the strands; if needed, lightly twist them to keep the strands together and ensure a snug fit inside the connector. Match the connector type to your wire gauge and application, paying close attention to terminal types: they should fit the wire without force, with the stripped copper fully inside the crimp zone. Keep insulation out of the conductor area to ensure a secure connection. Use color-coded connectors to verify the proper size and type quickly. Maintain a clean, well-lit workspace to improve precision, and inspect your crimping tools for wear or damage before starting to prevent poor crimps that may fail under load.

Secure Bond: One-piece tinned copper barrel locks wires securely with minimal voltage drop and high current flow, preventing short circuits on every joint; Corrosion-resistant crimp connectors with heat shrink tubing deliver reliable, long-lasting performance
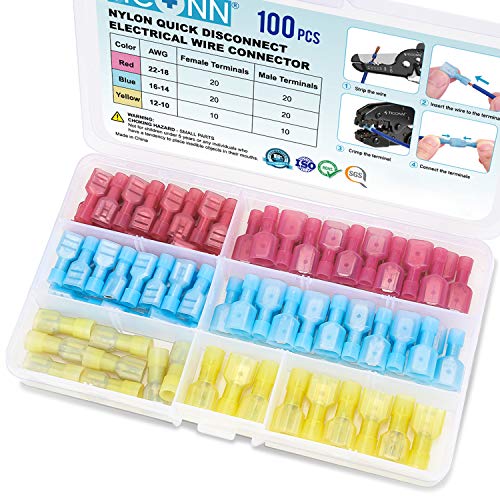
Solid Crimp: Thick tinned brass in every spade connector grips securely with low voltage drop and high current flow, helping prevent short circuits on each joint; Corrosion-resistant wire connectors deliver years of reliable service
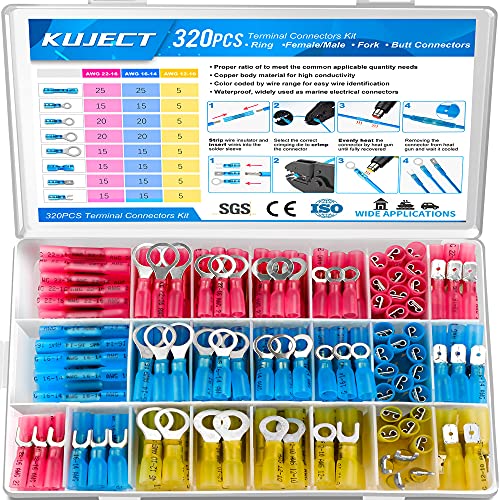
Multiple Choices: Proper ratio of various types to meet the commonly used types needs. This wiring terminals kit contains ring, fork, spade, and heat shrink butt connectors
How to Choose the Right Crimping Tool and Connector
To choose the right crimping tool and connector, start by ensuring compatibility between the connector and your wire gauge. Match the connector’s AWG range to your wire; for example, red-insulated terminals typically suit 22–16 AWG wires. Verify that the connector material matches your wire type—copper connectors are suitable only for copper wire. Selecting the right connector also involves reviewing top connector brands for solar panel compatibility and performance. Additionally, consider consulting a review of best inverters to ensure your overall power setup is reliable and efficient. You can also compare top battery tray features to keep your battery secure in the setup.
Select your crimping tool based on the connector style, not just brand. The die must correspond to the crimp profile—whether indent, F-crimp, or hex—to ensure a proper connection. Use a ratcheting crimper to apply consistent pressure, which guarantees reliable and repeatable crimps. Check that the tool’s size range covers your wire gauge to prevent under-crimping or deformation.
Maintaining your tools is crucial for long-term safety and performance. Keep the dies clean and free of debris, and regularly inspect them for signs of wear. Before crimping, always verify that the connector’s insulation support fits both the conductor and the insulation diameter to ensure a secure, safe connection.

Crimps insulated terminals onto 10-22 AWG stranded copper wire

Ratchet Crimper for Heat Shrink: Engineered for AWG 22-10 heat shrink connectors, insulated nylon terminals, and butt/splice connectors. Precision-machined crimping dies deliver uniform, rock-solid crimps—Whether you're wiring up a truck, fixing a dryer, or running outdoor lighting.

Crimping Tool Designed For Non-insulated Terminals-The professional jaws can quickly and easily crimp various types of non-insulated terminals. The indentation will not damage the shell during the crimp. It firmly grasps the wires. Each crimper tool is marked with wire size for easy identification.
How to Strip and Prepare Your Wire the Right Way
Start by stripping your wire to the right length, matching the connector’s barrel depth. This ensures the bare conductor fills the barrel completely, with no more than 1–2 mm of copper showing from the front. Use a proper wire stripper, selecting the correct cavity based on color coding or wire gauge. Make clean, square cuts without nicking or damaging the strands, as damaged copper weakens the connection. Keep stranded wires neatly aligned and twist only enough to prevent fraying—don’t over-twist. Immediately inspect the exposed conductor; if any strands look damaged or frayed, cut back and strip again. Confirm that the wire gauge matches your stripper opening before proceeding. Regularly maintain your tools by keeping the blades sharp to ensure clean cuts every time. Always verify that the wire is de-energized and in good condition before handling. Finally, perform a quick dry-fit to verify that the barrel is filled properly before crimping, ensuring the split contacts the side of the crimper’s jaws for secure placement.
How to Position the Terminal in the Crimping Tool?
To position the terminal correctly in your crimping tool, start by selecting the appropriate cavity. Match the terminal’s barrel to the exact die size specified for your wire gauge; using the wrong cavity weakens the crimp and can cause failure. Follow your tool’s markings closely to ensure proper size matching. For solar panel installations, many MC4 connectors require a specific die size to ensure reliable electrical connections. For small home setups, reviewing top solar panels can help confirm the connector specifications needed. For grounding applications, bare copper wire offers excellent conductivity and corrosion resistance for long-term reliability.
Next, focus on the terminal’s orientation. Insert the terminal so that its flat side faces up if required, and align the seam according to manufacturer specifications. Place the wire barrel’s center directly in line with the crimping jaw’s center, making sure it is fully seated within the die profile. Avoid positioning the barrel partially outside the die, as this compromises the crimp quality.
Once positioned, close the handles just enough to hold the terminal securely—avoid overcrimping at this stage. Use the locator to maintain the correct insertion depth and verify that the terminal remains centered and square before proceeding. Be cautious of common errors such as choosing the wrong cavity, off-center placement, or incorrect rotation, which can affect the integrity of the crimp.
How to Insert the Wire and Make the Crimp?
Insert the stripped wire fully into the terminal barrel until the insulation meets the edge or support point. Ensure all copper strands sit inside the crimp zone without any strands poking out, which helps prevent a weak connection. Your wire gauge must match the terminal cavity size; using the wrong size can compromise the crimp’s effectiveness. Only strip the necessary length of insulation to fit inside the barrel, leaving no bare copper beyond that point. Check that the conductor sits straight and isn’t angled, and make sure no insulation enters the conductor barrel. Hold the wire steady while squeezing the crimping tool handles firmly in one complete motion until the ratchet releases. Apply steady pressure throughout to deform the barrel evenly around the conductor. After crimping, perform a light pull test—if the wire stays secure, the crimp is proper and reliable. For added protection at the main panel, consider installing a whole-house surge protector to guard against voltage spikes. Always verify that terminal stamps indicate the correct wire gauge to prevent mismatched connections. This process is similar in principle to ensuring a secure electrical connection in a manual transfer switch setup. In automotive applications, this type of reliable connection helps prevent sparks when you remove the negative battery cable first.
6 Crimping Mistakes That Cause Weak Connections
Misusing your crimping tool can lead to weak or unreliable connections, even if the tool itself is in perfect condition. To avoid common pitfalls, start by using a proper crimper—not pliers—since pliers apply uneven pressure and produce a loose connection. Next, always match the wire gauge to the terminal and die size; mismatched sizes can leave voids or crush strands, increasing resistance. Proper crimping also means avoiding under- or over-crimping, both of which compromise joint strength and can cause overheating.
Be precise when stripping insulation by removing just enough to seat the conductor fully without nicking the copper, which can weaken the wire. Ensure the conductor is fully seated in the terminal before crimping. Verify that the terminal sits centered within the die; off-axis compression leads to inaccurate crimps. Lastly, always perform a strain relief or pull test to confirm the connection’s integrity. Regular maintenance of your tools, such as keeping dies sharp, helps achieve consistent results. Remember, your technique is crucial—methodical and careful work ensures strong, reliable connections.

Strong and Secure Crimps is The Core: The main job of the wire crimper is to make nice and clean crimp crimps! The hand-replacement crimping tool jaws is tightened securely, which also means that there is no jaw drop, especially in ocean and specific scenarios. When you change dies you fully remove a screw on both side and then realign the new dies in the jaws before tightening up the screws. Excellent investment for anyone professional or DIY user working with electrical connections

WIDE RANGE CRIMPING TOOL: Ratcheting crimping tool securely attaches heat shrink terminals onto 10-22 AWG stranded copper wire
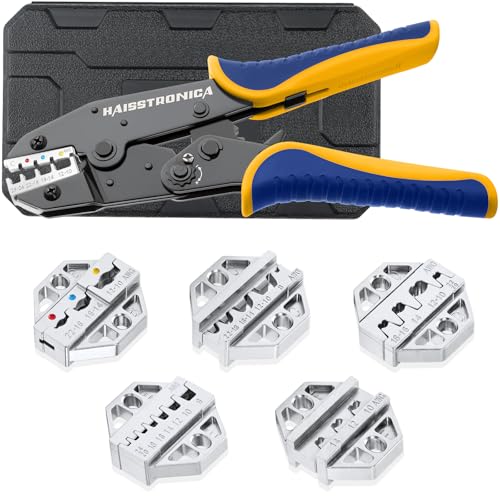
Strong Crimps Is The Core- The main job of the tool is to make beautiful crimps! The hand-replacement crimping tool jaws is tightened securely, which also means that there is no jaw drop, especially in ocean and specific scenarios.The haisstronica crimp tool jaws forged with 40CR precision technology can complete a firm crimp at one time. Instead of making your heat shrink look like it's been through a street fight.
How to Inspect a Crimp for a Reliable Connection?
To determine if your crimp is reliable, start with a thorough visual inspection. Ensure the stranded wire fills the entire barrel, with strands visible through any inspection window. The insulation should sit flush against the terminal, neither invading the wire barrel nor leaving excessive bare conductor exposed. Look for symmetry in the crimp—no twisting, cracking, or deformation should be present. Confirm the barrel is fully closed and has the proper bellmouth shape, which helps secure the wire and prevents damage.
Check that the terminal type and wire size match the crimp specifications. Color coding on crimping dies can guide you, but always verify dimensions with a micrometer to ensure compatibility. To avoid voltage drop in series and parallel solar panel setups, proper terminal matching is critical for consistent system performance. Conduct a pull-force test on sample crimps to confirm that the wire remains securely attached under load. Reject any crimp that shows exposed strands, cracks in the barrel, or incomplete insulation capture.
Good lighting and magnification are essential tools for catching small defects early. These detailed checks are crucial for ensuring the connection’s reliability, similar to how a solar generator relies on secure electrical connections to transfer energy safely. A quality crimp connection is comparable to the importance of using top-rated electrical components within a breaker box to avoid failures and ensure long-term safety. Skipping them can lead to failures or safety hazards later on.
How to Choose Between Insulated and Non-Insulated Terminals?
Insulated terminals are the safer choice in most situations because they provide built-in protection against short circuits and environmental damage. Their insulating sleeves, which are often color-coded to match wire gauge, help reduce the risk of electric shock and prevent moisture ingress. Without these barriers, non-insulated terminals depend on the enclosure or secondary insulation for protection, making them less suitable for exposed or harsh environments.
In applications involving open wiring or exposure to moisture, insulated terminals offer a significant advantage by sealing the connection and guarding against accidental contact. They are also preferred in environments with vibration or movement, such as automotive or marine settings, where the insulation prevents shorts caused by shifting components. Conversely, non-insulated terminals can be advantageous in controlled, enclosed panels where space is limited and environmental exposure is minimal, due to their smaller size and lower cost.
Always match your terminal type to your crimping tool’s cavity to ensure a secure connection. When safety is a priority, prioritize insulated terminals because they provide a reliable barrier against accidental contact and environmental factors. While non-insulated terminals may be suitable for certain controlled environments, the added safety features of insulated options make them the better choice for most practical wiring applications.

Package included: Total 200 pcs, 90 pcs red connectors for 22-16 AWG, 80 pcs blue connectors for 16-14 AWG, 30 pcs yellow butt connectors for 12-10 AWG

RockDIG wire connectors are made from 99.9% purity high-quality copper material, Tin-plated to resist corrosion, for maximum conductivity; and the male/female spade connectors are made from brass for better hardness.

300PCS Wire Connectors Kit: 17 types of electrical connectors kit in the most commonly used sizes, which includes 2.8mm, 4.8mm, 6.3mm male and female spade connectors, fork connectors and ring terminals
When Should You Use Heat-Shrink or Sealing?
Use heat-shrink or sealing immediately after completing your crimp when moisture, vibration, or long-term environmental exposure is a concern. In harsh environments like automotive, marine, or aerospace wiring, waterproof protection is essential. Adhesive-lined heat-shrink tubing creates a water-tight seal by melting and flowing around the crimp joint, preventing moisture from entering entirely. This helps avoid corrosion by keeping water, humidity, and salt spray away from the metal barrel. For setups prone to vibration, sealed connectors improve mechanical stability and reduce the risk of wire pull-out. After making the crimp, apply heat until the adhesive flows to the ends, then let it cool fully before handling. The full coverage with a continuous adhesive line guarantees a durable seal. Never skip sealing in severe conditions, as it is vital for ensuring long-term reliability, especially in joints that are difficult to inspect later.

3:1 SHRINK RATIO & FAST CONTRACTON SPEED: Shrinks to 1/3 of its original diameter and seals extremely tightly, solving the problem of many 2:1 shrink tubes that don't shrink enough and therefore don't seal tightly enough, Shrink temperature: 80 to 125°C, Provides a professional connection within seconds.
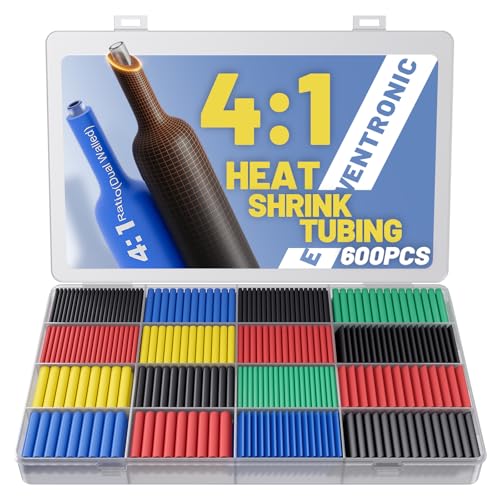
4:1 Shrink Ratio & Fast Contraction: Shrinks to 1/4 of its original diameter, delivering 30% better sealing tightness than standard options. Solves the common issue of 2:1/3:1 heat shrink tubing failing to shrink sufficiently. With a shrink temperature range of 80-125°C, heat shrink tubing forms professional-grade connections in just seconds—ideal for projects needing quick, reliable insulation.

【Industry-Leading 5:1 Shrink Ratio】 Experience superior versatility with our advanced 5:1 shrink ratio. This heavy-duty tubing shrinks to one-fifth of its original diameter, providing a perfect, tight seal over complex connections, irregular shapes, or large terminal ends. Ideal for repairs where the object size varies significantly.